Many importers conduct third-party inspections to verify the quality of their products before they leave the factory.
At Insight, we’ve conducted tens of thousands of inspections for our customers and have a well-established process for doing so. This process helps ensure that you receive your products in the condition you expect without an unacceptable number of defects.
So, once you’ve placed your order with a factory and decide to schedule an inspection, what happens next?
Here, we’ll take you through the process and give you a better idea.
The 10 Steps We Follow After Every Inspection Request

The process begins when you submit your inspection request or the factory does so on your behalf. Whether you’ve placed an order for dining room tables, mobile phones, flooring products, or something else, it is time to proceed to the first step.
Step 1 – We Contact the Factory to Confirm the Requested Date and Inspection Details
Nobody wants to show up at the door and realize their host wasn’t expecting them. We need to make sure the factory is planning to be ready on the requested date and that they’re on the same page as our inspection team.
Step 2 – We Review the Request to Ensure We Have All Necessary Documentation
Every inspection requires an inspection checklist and approval sample. If there isn’t a “golden sample” available to us yet, we need to arrange to receive one before the inspection. We coordinate with you and the factory to ensure we have any other necessary items as well.
Step 3 – We Assign an Inspector
Our team of inspectors is always standing by and ready for action. We’ll sync up our internal calendars and assign the right person to the job. That way, they’ll be ready to go on inspection day.
Step 4 – We Check-in With the Factory the Day Before the Inspection
Again, because we don’t want to waste anyone’s time, we have to make sure we’re on the same page with the factory. Our inspector is now raring to go and thinking about all the exciting products they get to inspect tomorrow.
Step 5 – The Inspector Travels to the Factory
It’s time for the inspector to hop into a vehicle and head over to the factory. Once they arrive, they’ll have a quick meeting with the supplier’s quality person or another point of contact, i.e. the sales manager.
Step 6 – The Inspector Pulls the Sample Based on Lot Size
The inspector needs to pull the products to inspect. To select the right number of cartons, they take the square root of the total plus one. For example, if there are 100 cartons, they’d select 11 of them. Then, they follow the AQL sampling method and pull the appropriate number of products from each carton.
Step 7 – The Inspector Pulls the Items That Require Special Testing
Many products require special testing — and these tests can be time-consuming. For example, an electronic massager might need to undergo a charge test. Since charging the device might take several hours, the inspector needs to start the process right away.
Step 8 – The Inspector Conducts the Remainder of the Inspection
Guided by the inspection checklist, they check packaging and labeling, inspect the products visually, verify that they function as expected, check weights and measurements, and do a carton drop test if required.
Step 9 – The Inspector Reviews Their Inspection Findings With the Factory
Once the inspector finishes checking all the products in the sample, they loop the factory in on the results. This way, the supplier has an idea of whether or not you’re likely to accept the shipment and they can begin thinking about how to correct any defects if required.
Step 10 – We Turn the Results into a Formal Inspection Report and Send it to You
The inspector submits the inspection report internally for review by other members of our team. We review it and turn it into a formal report. With a little bit of polish and client-ready formatting, it’s now ready to be distributed.
We then send you a clean, easy-to-read inspection report, complete with all the results of the checks performed and a plethora of product photographs. These will give you a clear idea of your shipment’s condition so that you’re ready to take action on the inspection findings.
Take a look at our sample QC inspection report, here.
What Do You Do With Your Inspection Report?
Once you’ve received your inspection report, it’s time for you to make a decision based on the results.
You’ll get a Pass, Fail, or Hold result for the inspection, and you’ll see the results of all the checks our inspector performed. We suggest that you review all sections of the report in detail — especially in the beginning — and pay careful attention to the photographs.
You can use this report to decide whether to accept or reject the shipment. If you accept it, the factory has the green light to proceed as planned. If you reject it, you’ll need to work on a solution with them, for example, to rework or remake certain units.
If you haven’t already seen our sample inspection report, we recommend you take a look at it.
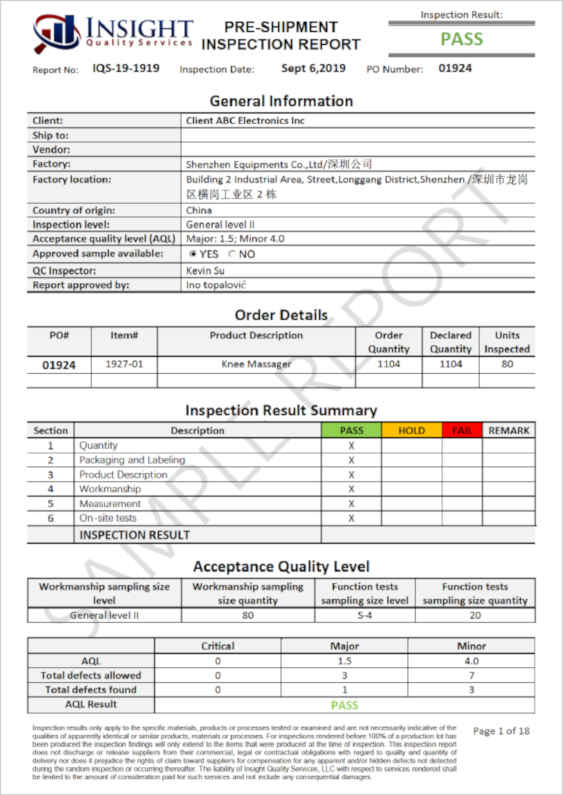
Download a Sample Inspection Report
Each time a product inspection is completed, we send you a report with the inspector’s findings. This inspection report gives you key information about the condition of the lot inspected.
It shows the results of each check performed and includes a collection of photos taken by the inspector. The photos allow you to see the condition of the products and packaging exactly as they looked during the inspection.


0 Comments